Overview
In this article, we will discuss how to enable Microsoft Information Protection (MIP) sensitivity labeling for Microsoft 365 Groups, Teams, and SharePoint Online sites. By default, this setting is disabled on every new Microsoft 365 tenant build. Therefore, when you plan to deploy MIP services for data classification to protect your organization’s data on Microsoft 365 Groups, Teams, and SharePoint, you need to enable this setting. To do so, you can follow the steps outlined below.
Prerequisites
Before starting, ensure that you have the following:
- Administrative Permissions: You must have Global Administrator or Security Administrator privileges in your Microsoft 365 tenant.
- PowerShell Modules: Ensure that the necessary PowerShell modules are installed and up-to-date.
Step 1: Install Required PowerShell Modules
Open PowerShell as an Administrator and run the following commands to install the necessary modules.
AzureAD Preview Module
The AzureAD Preview module is required to manage Azure Active Directory (Azure AD) settings.
Install-Module AzureADPreview
SharePoint Online Management Shell
Ensure that your SharePoint Online Management Shell is version 16.0.19418.12000 or above. If not installed or if you need to update, run:
# To install the required version
Install-Module -Name Microsoft.Online.SharePoint.PowerShell -RequiredVersion 16.0.19418.12000
# Or, if you already have it installed and need to update
Update-Module -Name Microsoft.Online.SharePoint.PowerShell
Step 2: Connect to Azure AD
Next, connect to your Azure AD tenant to configure the Unified Group settings.
Connect-AzureAD
Step 3: Retrieve Unified Group Settings
Run the following command to retrieve the directory setting object for Unified Groups. This object allows you to configure settings, including enabling MIP labels.
$Setting = Get-AzureADDirectorySetting -Id (Get-AzureADDirectorySetting | where -Property DisplayName -Value "Group.Unified" -EQ).id
If the Command Fails:
If you encounter the error:
Get-AzureADDirectorySetting : Cannot bind argument to parameter ‘Id’ because it is null
Follow the next steps to manually create the directory setting.
Step 4: Create and Configure the MIP Directory Setting
To create the necessary directory setting for Unified Groups and enable MIP labels, run the following commands:
# Retrieve the template ID for Group.Unified
$TemplateId = (Get-AzureADDirectorySettingTemplate | where { $_.DisplayName -eq "Group.Unified" }).Id
# Create a directory setting template object
$Template = Get-AzureADDirectorySettingTemplate | where -Property Id -Value $TemplateId -EQ
# Create a new directory setting object
$Setting = $Template.CreateDirectorySetting()
# Enable MIP Labels for Unified Groups
$Setting["EnableMIPLabels"] = "True"
# Create the directory setting in Azure AD
New-AzureADDirectorySetting -DirectorySetting $Setting


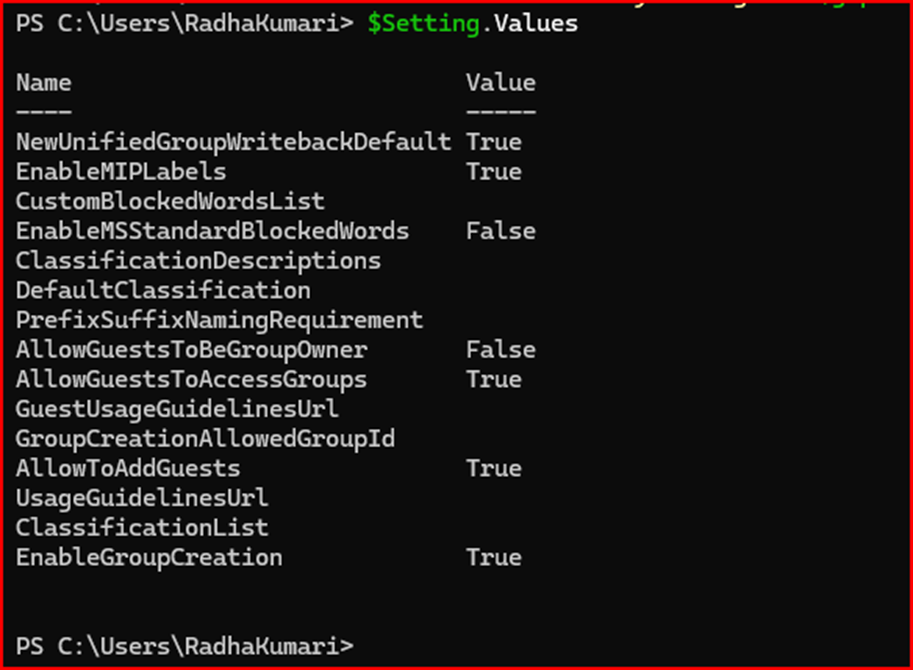
Step 5: Verify the Unified Group Settings
After creating the directory setting, run the following command to verify that the MIP labels have been enabled:
$Setting = Get-AzureADDirectorySetting -Id (Get-AzureADDirectorySetting | where -Property DisplayName -Value "Group.Unified" -EQ).id $Setting.Values
You should see the follow

wing output, confirming that MIP labels are enabled:
Conclusion
By following the above steps, you have successfully enabled Microsoft Information Protection (MIP) labels for Teams, Groups, and Sites at the container level. These settings will ensure that sensitivity labels are consistently applied across collaborative environments, helping to protect your organization’s data. Please note that it may take up to 24 hours for these configurations to apply and propagate to all applications.
Next Steps
Monitor the implementation by checking the MIP settings in your Microsoft 365 Compliance Center and ensure that the labels are being applied as expected. Additionally, consider refining your label policies based on the organization’s evolving needs.